How to Take a Screenshot in Microsoft Windows Overview
Did you know that you can take a screenshot with your Microsoft Windows computer? Most probably, you didn’t.
There are times that we always in need of capturing something on our computer screens either for future reference or for any other reason.
Before taking any screenshot, make sure that there no destruction on the screen.
Whether you want to take a screenshot of the full screen or you just to a part of it here are the ways in which you can do it
Taking a screenshot on any area of the screen
If you want to take a screenshot on only part of your screen then, you should press these 3 keys simultaneously on your keyboard. (Windows logo, Shift, and S).
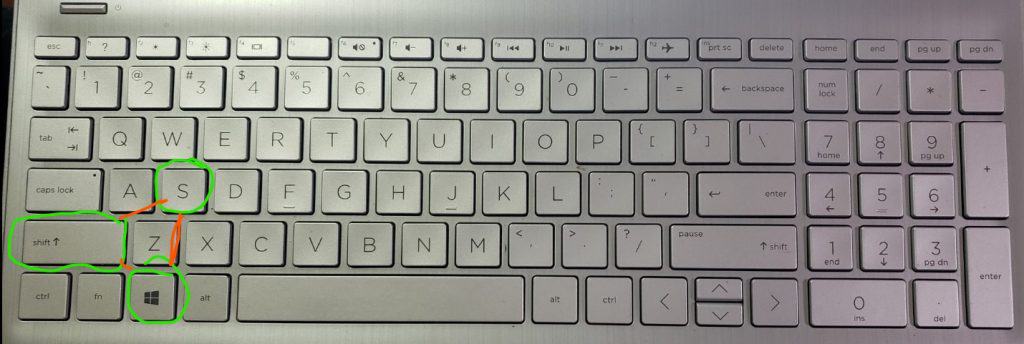
1. Press {Windows logo key + Shift + S}. When you do this your screen will automatically turn grayish.
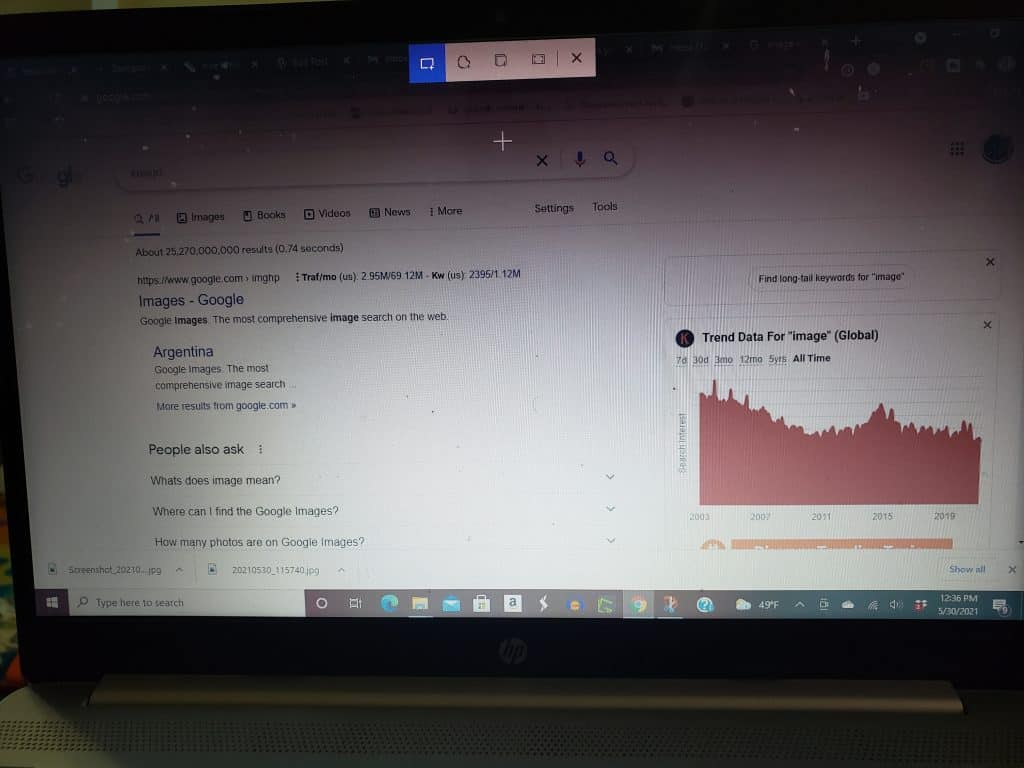
2. Select the shape that you like and Drag your mouse cursor to the part of the screen that you want to screenshot.
3. Immediately after doing this, the screenshot will be copied to the clipboard.
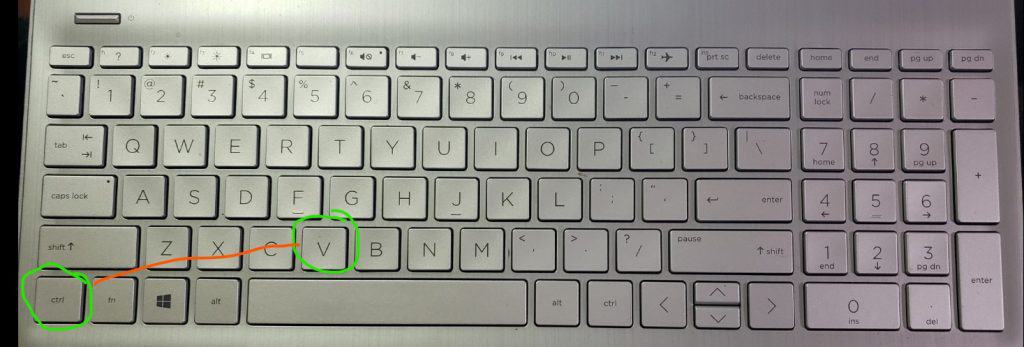
4. You can then paste it to any application by simply pressing Ctrl + V.
How to access the snipping and sketch tool fast to annotate your screenshot
1. After using {Windows logo key + Shift + S}, your screenshot will show up momentarily as a notification in the lower right corner of your screen.
2. Simply click on the notification before it disappears.
Note: If you miss the notification, you just need to open the notification and you will see it in the setting there.
3. This will open your screenshot with the snipping and sketch tool, so you can use it to annotate as you like, then save or share it.
Taking a screenshot of a full screen
When you want to take a screenshot of a full screen, follow the below steps.
1. Go to the page you want to screenshot and make sure that there no distractions to it.

2. Hold down Windows logo key, then press (PRT SC) key {Windows logo key + PRT SC}
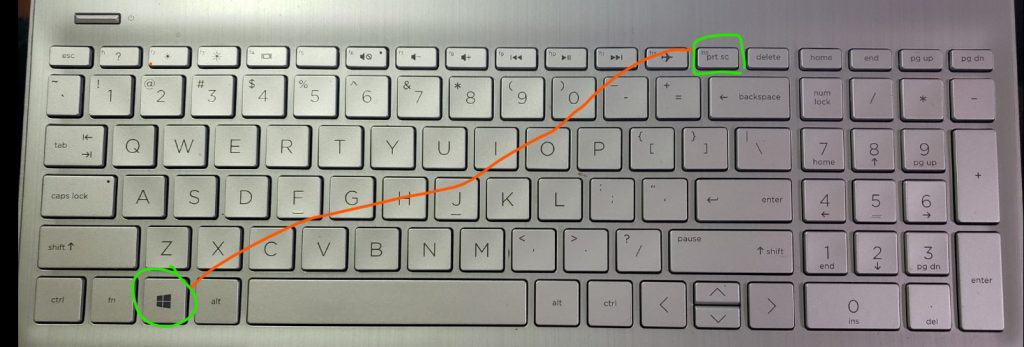
Note: [ PRT SC } or something similar is located on the top right middle of your screen, you find a print screen button mostly indicated as to this.
3. Your screen will appear dim for a short period.
How to find a picture of the screenshot that you just took
If you want to find the screenshot that you have taken, go to your PC photos, it will be in the folder of your screenshot.
If you have been wondering about how you can take a screenshot on your Microsoft computer, either full screen or only a part of the screen. The above ways will guide you on how you can do it.
How to use Snipping Tool program to take and edit Screenshot
If you have been using the tedious “Print Screen” method to capture screenshots on your Windows PC, you will probably be impressed to discover that you can use the snipping tool program to accomplish the same task faster.
Assuming this sounds new to you, read our step-by-step guide on how you can make this possible.
How to Use Snipping Tool Program to Take and Edit Screenshot
1. Start By Opening Snipping Tool Program
The fastest way to open the Snipping Tool Program on your PC is by searching it in the computer’s “Start Menu”. Type the word “Snipping” on the “Start Menu” and hit Enter. Once it appears, right-click on its icon and select “Pin to Taskbar” for quick access.
2. Capturing Screenshot
Once you have successfully launched the Snipping Tool program on your PC, you will be presented with a simple window. For you to take a screenshot, you will be prompted to pick one of the 4 modes:
• Free Form Snip – with this you can freely draw freehand shapes
• Rectangular Snip lets you draw a box around the area you wish to take a screenshot.
• Window Snip – with this mode you can take a screenshot of the entire screen
• Full-Screen Snip – this captures the entire display – including the PC monitor.
3. Capturing Delayed Screenshot
If you are using Windows 10, you will like it that you can take a screenshot of a context menu that quickly disappears as soon as you make a click. To do this, select the “Delay” icon and pick between 1 to 5 seconds. Click on the “New” Icon and wait for the tool to present you with the capture prompt.
4. Editing Screenshot in Snipping Tool Program
Once screenshots are captured, they will open in Snipping Tool Program from where you can preview and edit them. The tool offers you some significant editing tools e.g.
• Pen – to draw
• Highlighter – point out the focal point of the screenshot,
• Eraser – remove unwanted parts, etc.
Saving and Sharing Captured Screenshot in Snipping Tool Program
Once you are convinced that your snips as per your needs, you can save them or share them with your friends via email.
To accomplish this click on the “Save” Icon and save to your desired location on the PC. From there you can easily share them by copy-pasting to clipboard, sharing directly via PC, or posting wherever you wish.
Conclusion
After this guide, you now know how to take and edit screenshots with the snipping tool program. Wave goodbye to your traditional PrntScr method and embrace a faster and convenient one.
.
